Never Miss A Show, Never Miss A Game! 10,000+ Global Channels/Streams Works On Most Devices

How To Use ForestIPTV on Your Device
Even though IPTV Smarters is listed on Google Play Store and Apple App Store for Android and iOS mobiles respectively, Amazon Store does not host it. Therefore, if you want it on your FireStick, you will need to sideload it.
To sideload any app on your device, you should have the option Apps from Unknown sources enabled or turned on. So, let’s take care of this part first before we install IPTV Smarters on FireStick:
– On the home screen of your FireStick, you will find the menu bar on the top
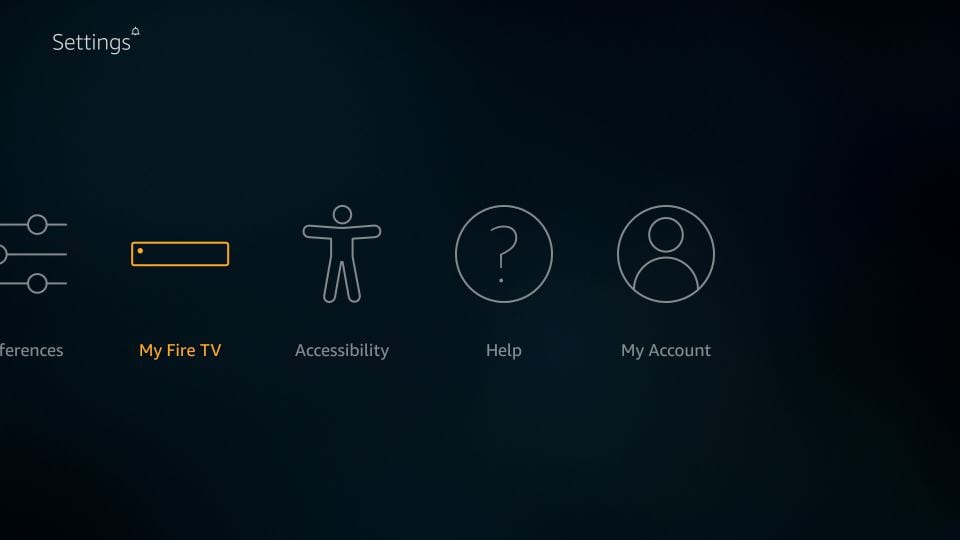
In the menu bar, select Settings
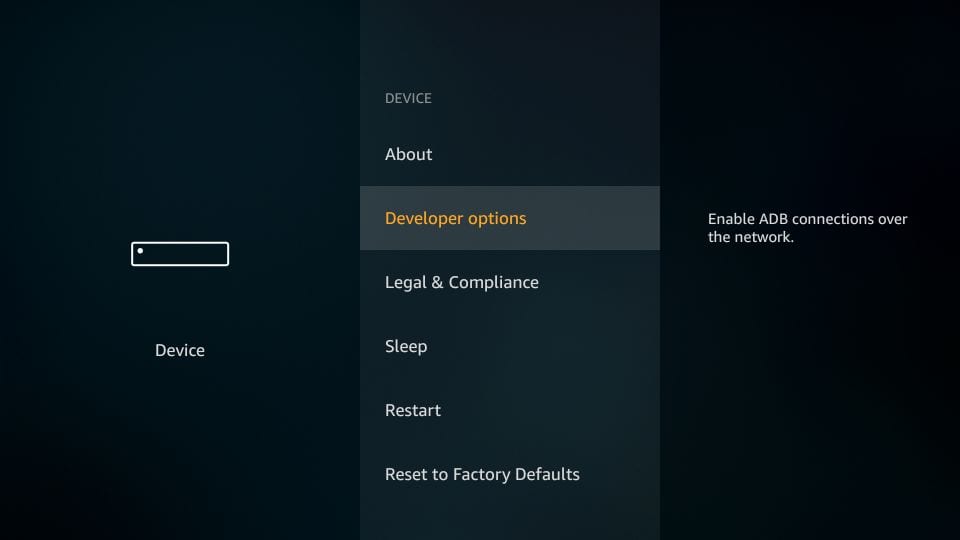
– In the Settings, choose the option My Fire TV
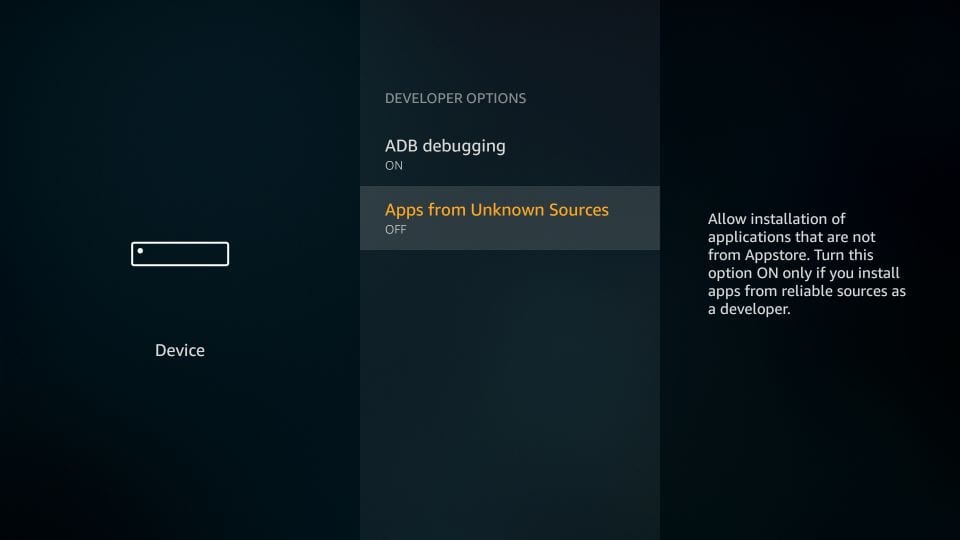
– When the following set of options are displayed on the next screen, click Developer Options
– Now, you need to check whether Apps from Unknown Sources is OFF or ON
Click it once if it is OFF
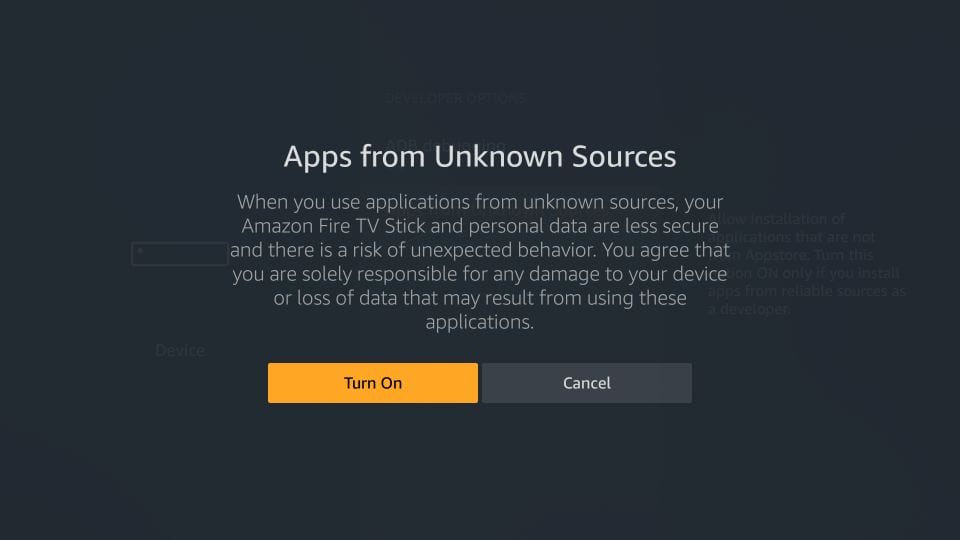
– A quick warning message is displayed
To keep Apps from Unknown Sources switched on, click Turn on
With this, you have configured the FireStick settings to allow the installation of IPTV Smarters and other third-party apps. Follow the steps below:
STEP 1:
We will first install the Downloader app
This app will help you sideload IPTV Smarter on FireStick (because browser downloads are not allowed)
STEP 2:
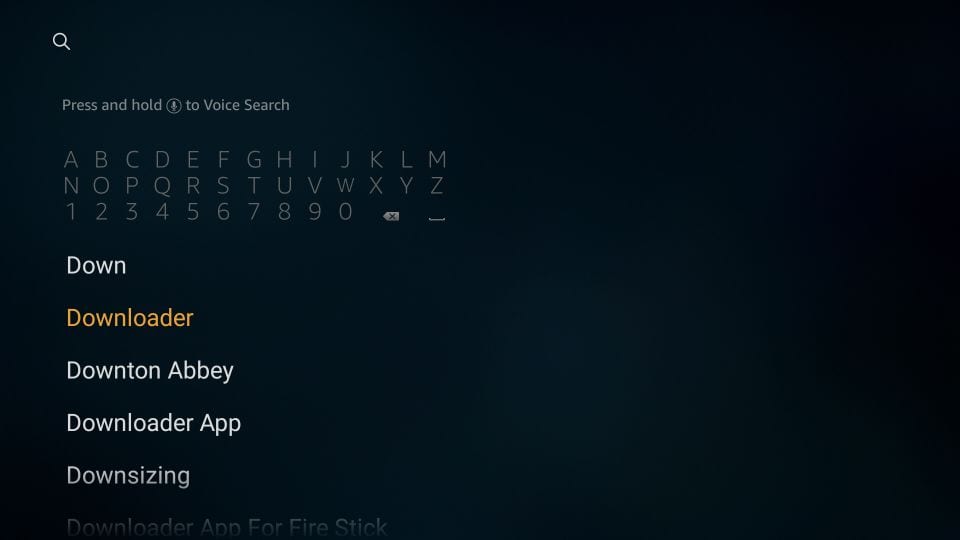
Highlight the Search option on the home screen of FireStick
Type the name of the app (which is Downloader)
Click the Downloader option when it is displayed in the search results
Choose the Downloader icon on the following screen and download and install the app
STEP 3:
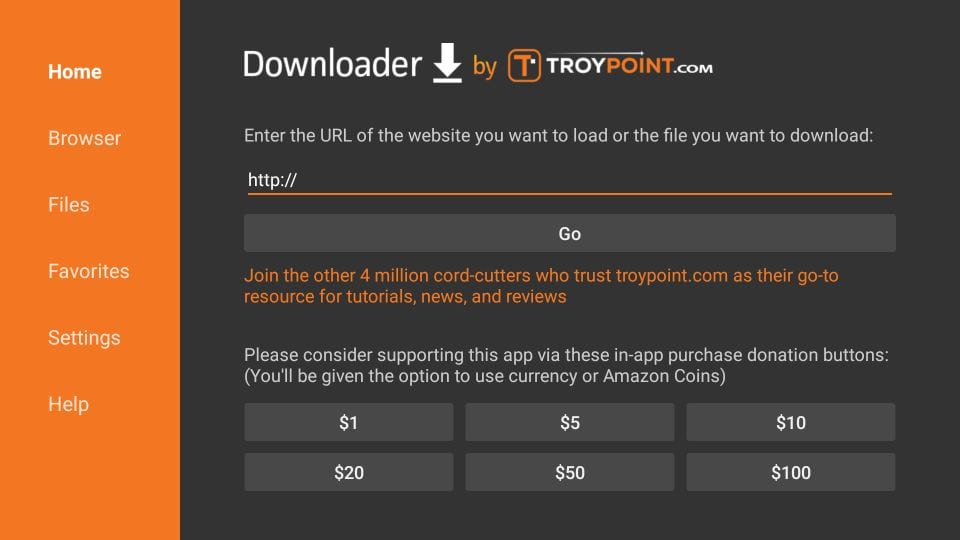
You may now open the Downloader app
When you run this app for the first time, a set of prompts will appear. Dismiss them until you see the following screen
On this screen, you need to click the URL textbox on the right side (make sure the Home option in the left menu is selected) where it says ‘http://’
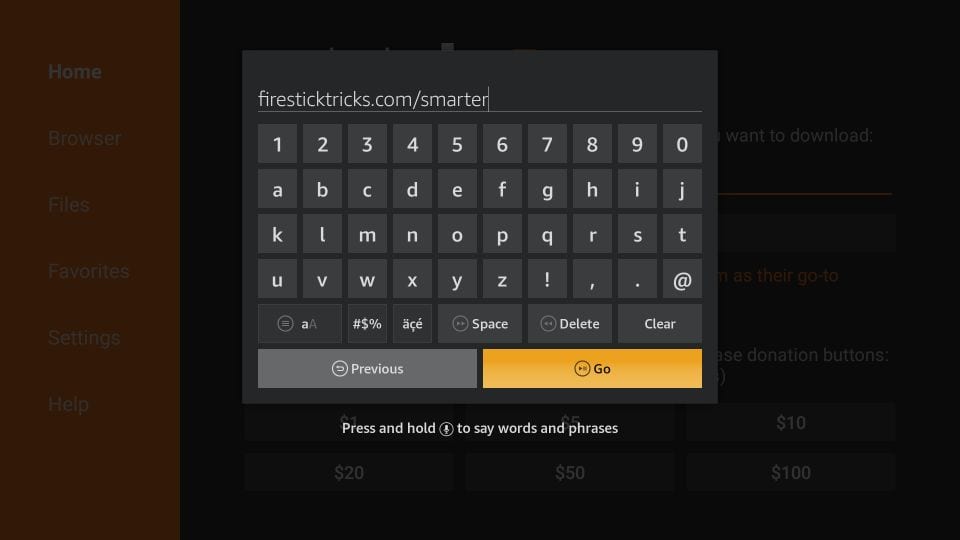
STEP 4:
Go ahead and enter the following path on this window: https://www.firesticktricks.com/smarter
Note: You may also use the shortened version of the URL firesticktricks.com/smarter
Click GO
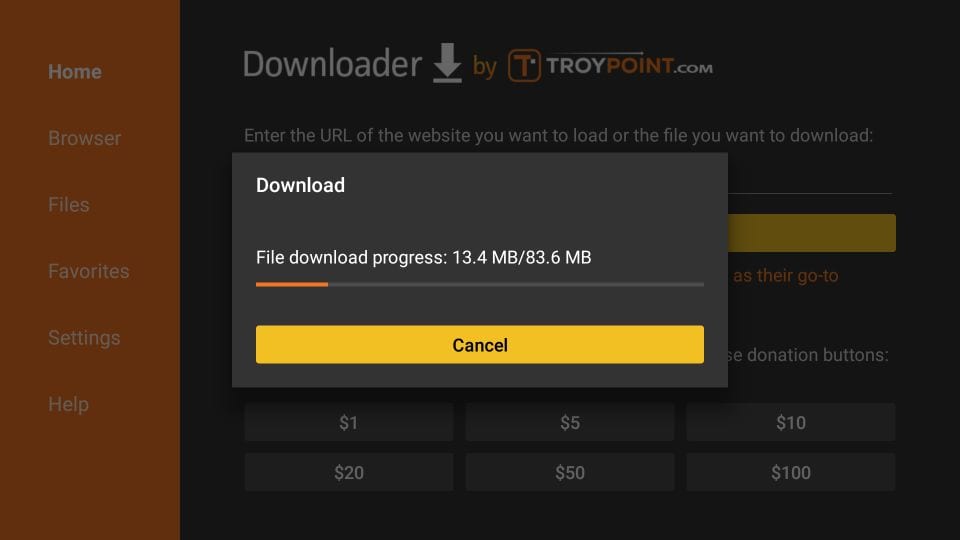
STEP 5:
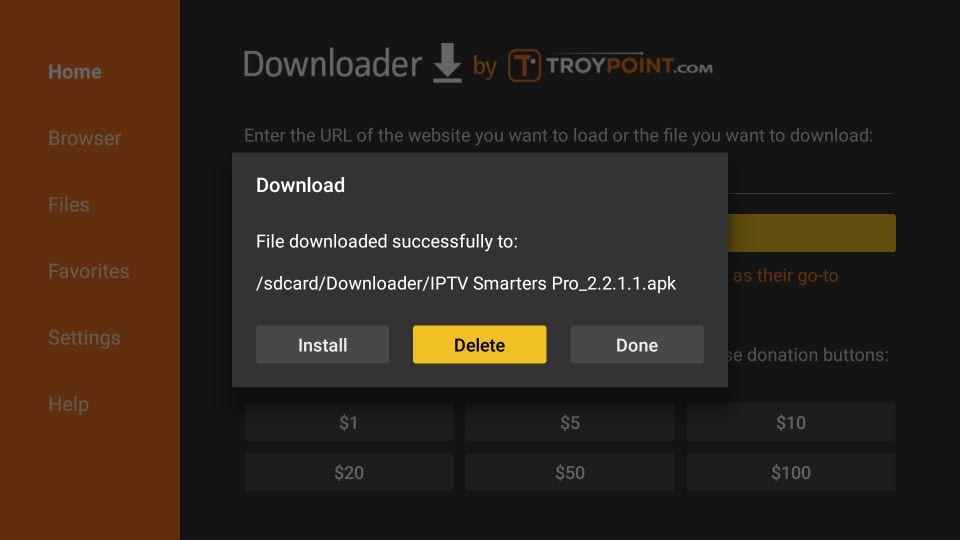
Give it a minute or two until the IPTV Smarter is downloaded onto your FireStick device
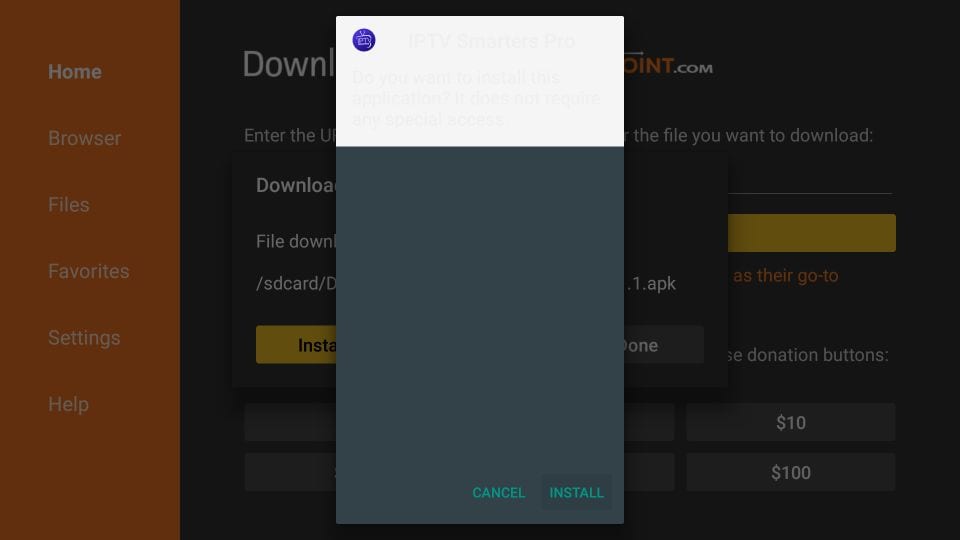
STEP 6:
When the download has completed, the Downloader app will run the APK file and the installation will start
Click Install
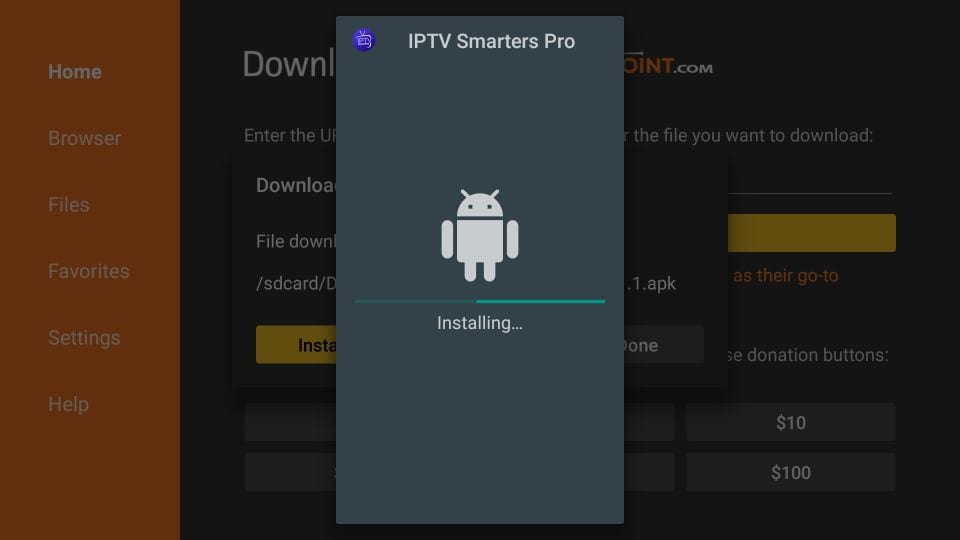
STEP 7:
Wait for the installation to finish
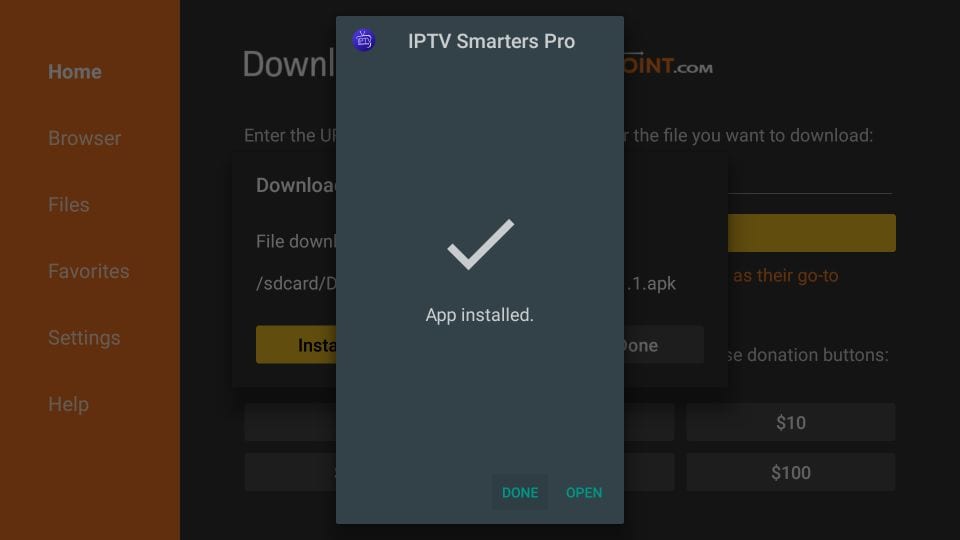
STEP 8:
Installation is concluded with the App installed notification
You may now choose to click OPEN and get started with IPTV Smarters
I recommend choosing DONE so that you may first delete the APK file and save some space on the FireStick storage
STEP 9:
If you clicked DONE above, you will be back on the Downloader interface
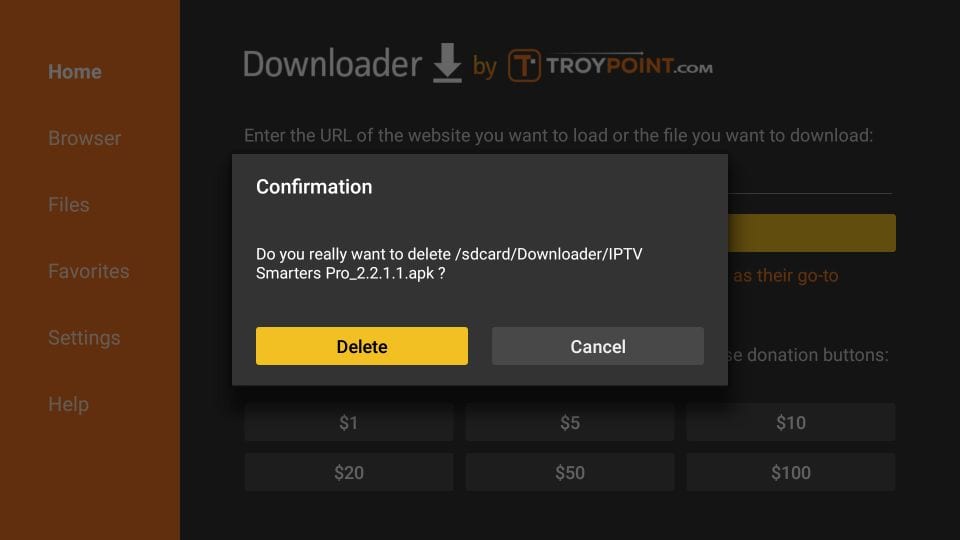
Click Delete
STEP 10:
Again, click Delete
Great! You now have the IPTV Smarters app on FireStick.
When you run the IPTV Smarters app for the first time, Terms of Use will be the first window. Scroll down and click Accept.
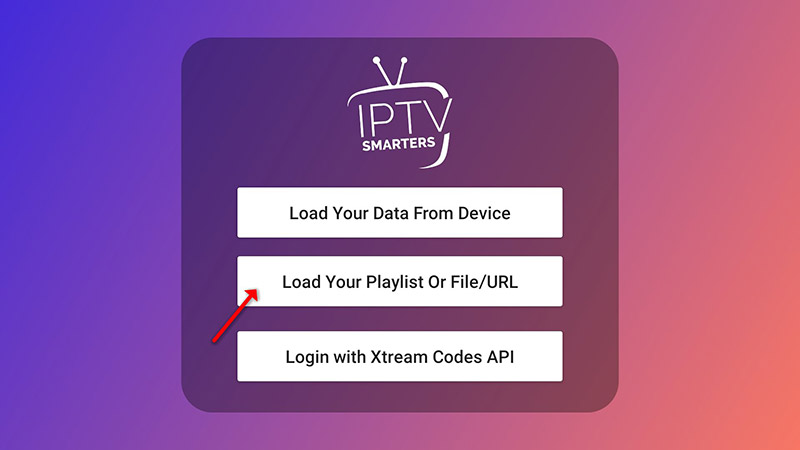
You can add IPTV channels to IPTV Smarters in two ways:
- Setup via Xtream Codes API.
- Setup via Playlist.
Setup IPTV Smarters via Xtream Codes API
We recommend setup via Xtream Codes API because you will have the Catchup feature this way and also do not need to add any EPG URL (it will load automatically).
STEP 1:
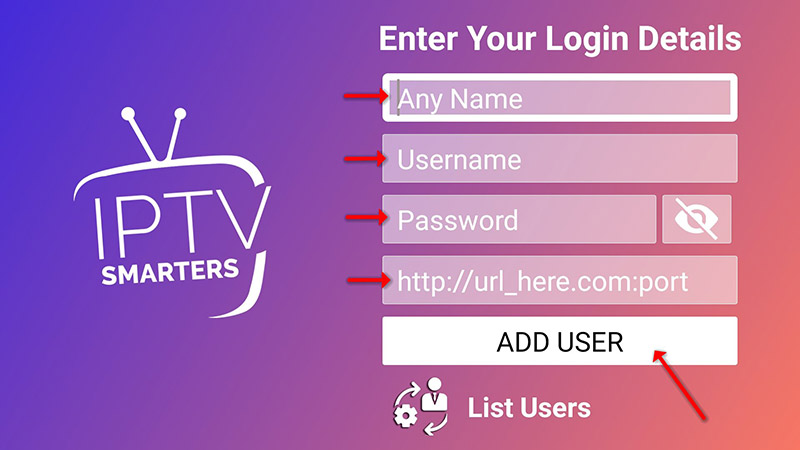
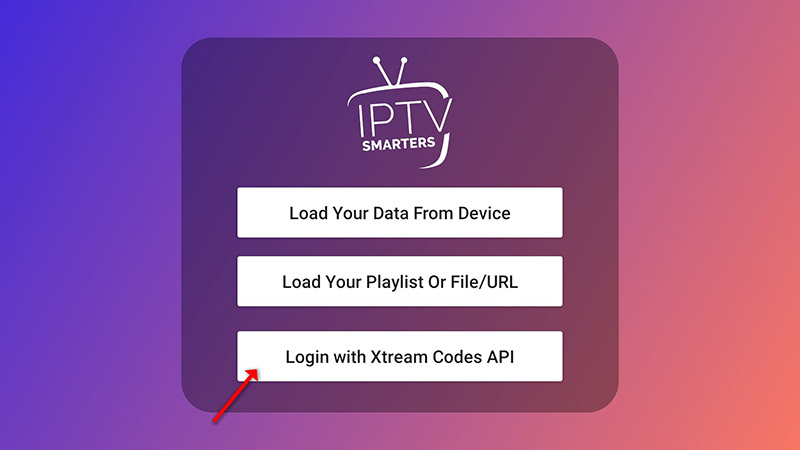
Open the app once downloaded and click on “Add user” then click on “Login with Xtream Codes API“.

STEP 2:
In this step, in the first box, select any name you want for example “IPTV Xtream”. On the second and third boxes, enter the “Username” and the “Password” of your M3U line and the server URL which can also be found on your M3U line.
Now Click on “ADD USER” to proceed to the next section.
STEP 3:
Wait some seconds.
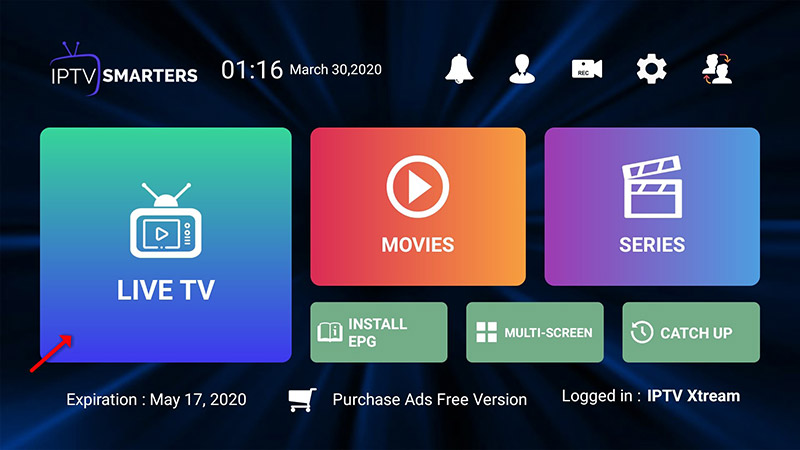
STEP 4:
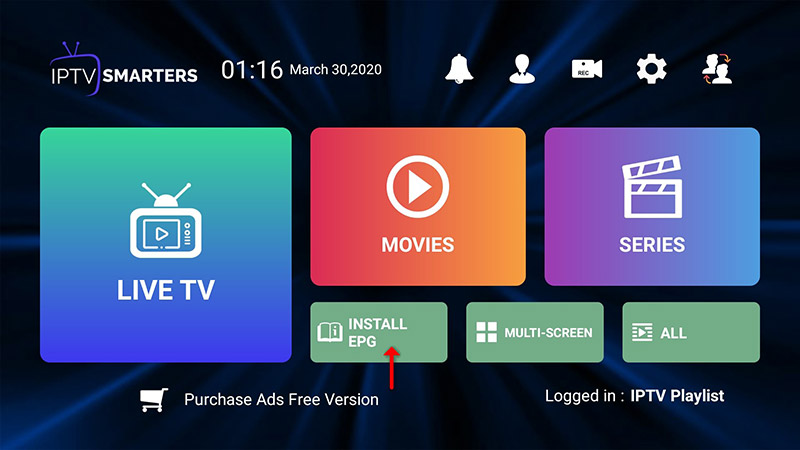
Now click on the “Live TV” icon as depicted in the image via a red arrow.
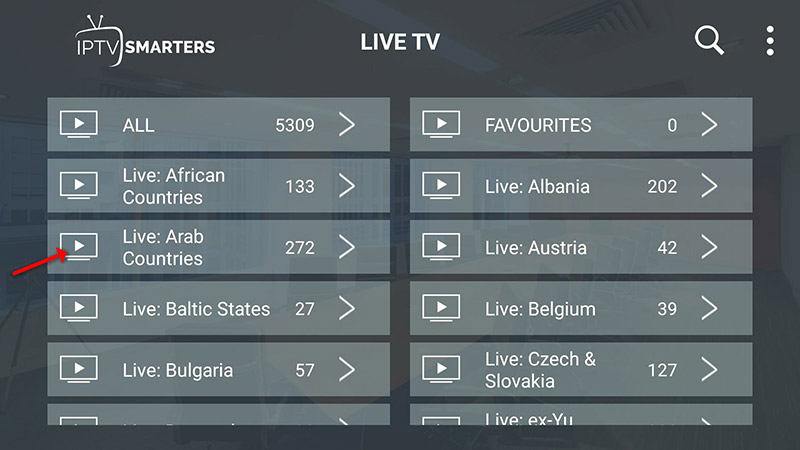
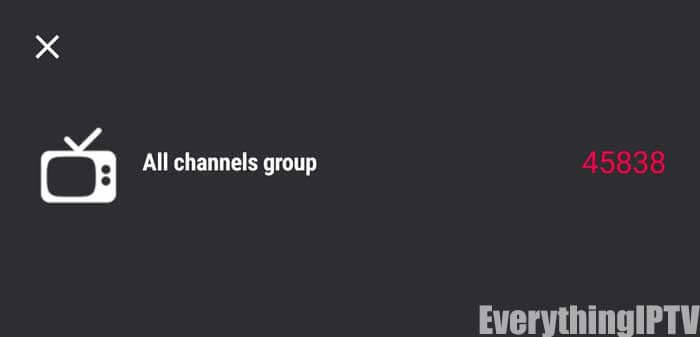
STEP 5:
Now you must select the channel group that you want to watch and proceed to the next section.
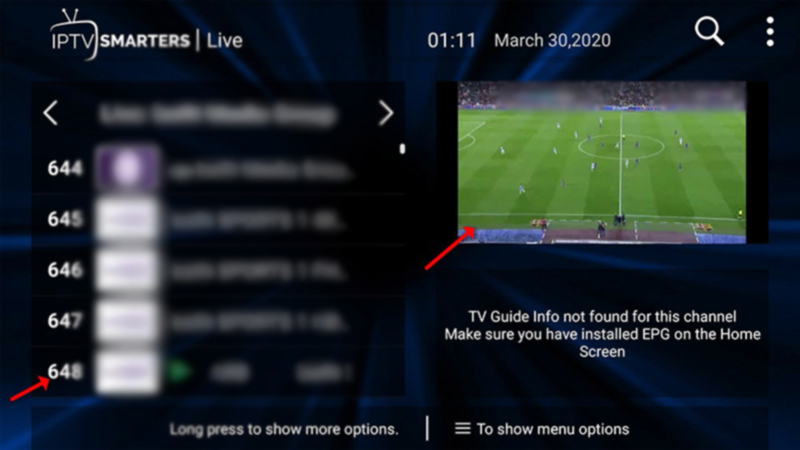
SETP 6:
Now you must click on the channel name and then double click on the small screen to turn into the full screen as the final step.
STEP 7:
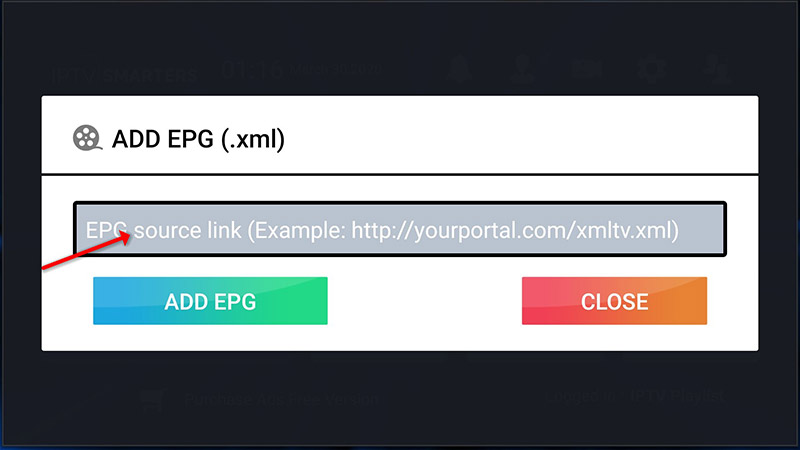
To add EPG no need to add any EPG URL, Just click on “Install EPG“.

Setup IPTV Smarters via Playlist
If you don’t have an Xtream Code API, you can use an M3U URL and choose to Load Your Playlist or File URL.
STEP 1:
Open the app once downloaded and click on “Add user” then click on “Login with Playlist“.
STEP 2:
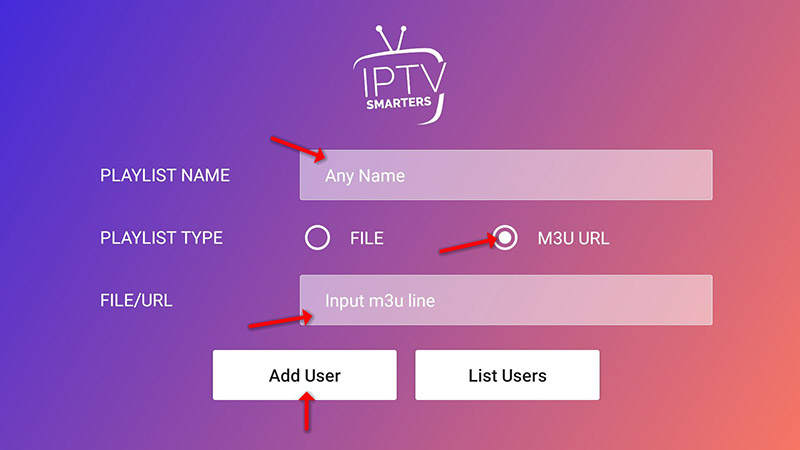
In this step, in the first box, select any name you want for example “IPTV Playlist”.
Select “M3U URL” and enter the M3U URL which you get from your IPTV provider.

STEP 3:
To add EPG click on “Install EPG” and enter the EPG url.

STEP 4:
Now click on the “Live TV” icon, select channels group then the channel you want to watch.
IPTV Smarters is one of the most user-friendly IPTV player applications that provides you the facility to watch Live TV, VOD, Series, Catchup, and Multi-Screen on your Android Devices (Mobiles, Android Boxes, Fire TV Stick, etc.). One of the most interesting features in IPTV Smarters is Catchup. They are not many applications that provide Catchup, before we only have this feature in MAG boxes. Also, you have a Multi-Screen feature in which you can watch up to 4 channels simultaneously.
You can add IPTV channels to IPTV Smarters in two ways:
- Setup via Xtream Codes API.
- Setup via Playlist.
Setup IPTV Smarters via Xtream Codes API
We recommend setup via Xtream Codes API because you will have the Catchup feature this way and also do not need to add any EPG URL (it will load automatically).
STEP 1:
Start by downloading IPTV Smarters app from the Google Play Store through this URL:
https://play.google.com/store/apps/details?id=com.nst.iptvsmarterstvbox&hl=en_US
install the app on your Android device.
STEP 2:
Open the app once downloaded and click on “Add user” then click on “Login with Xtream Codes API“.
STEP 3:
In this step, in the first box, select any name you want for example “IPTV Xtream”. On the second and third boxes, enter the “Username” and the “Password” of your M3U line and the server URL which can also be found on your M3U line.
Now Click on “ADD USER” to proceed to the next section.

STEP 4:
Wait some seconds.

STEP 5:
Now click on the “Live TV” icon as depicted in the image via a red arrow.

STEP 6:
Now you must select the channel group that you want to watch and proceed to the next section.

SETP 7:
Now you must click on the channel name and then double click on the small screen to turn into the full screen as the final step.

STEP 8:
To add EPG no need to add any EPG URL, Just click on “Install EPG“.

Setup IPTV Smarters via Playlist
If you don’t have an Xtream Code API, you can use an M3U URL and choose to Load Your Playlist or File URL.
STEP 1:
Open the app once downloaded and click on “Add user” then click on “Login with Playlist“.

STEP 2:
In this step, in the first box, select any name you want for example “IPTV Playlist”.
Select “M3U URL” and enter the M3U URL which you get from your IPTV provider.
STEP 3:
To add EPG click on “Install EPG” and enter the EPG url.

STEP 4:
Now click on the “Live TV” icon, select channels group then the channel you want to watch.
GSE SMART IPTV app is one of the most popular streaming apps for IPTV. The app itself does not include any channels so you’ll need an active M3u playlist to stream live TV channels and movies. You can find free M3U URLs online and in forums but also have the choice to purchase paid M3U subscription which may be more reliable.
For this tutorial to work you’ll need an active M3U playlist. Next, you’ll need to download the GSE SMART IPTV app (here’s the link to the app store)
STEP 1:
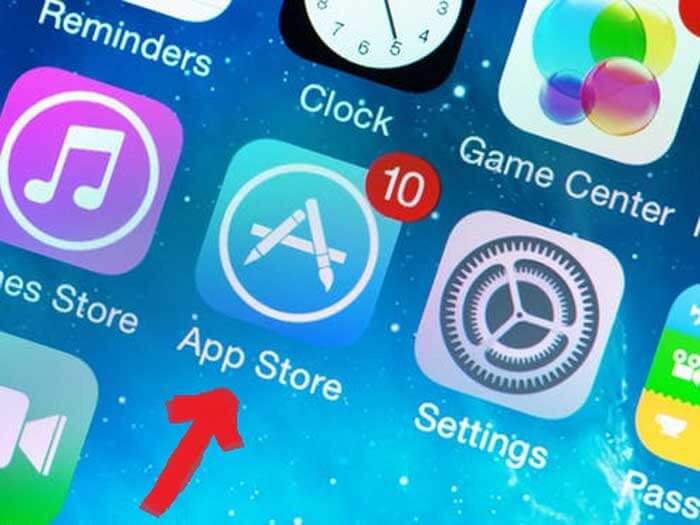
Locate and open the App Store on your iPhone/iPad/Apple TV.
STEP 2:
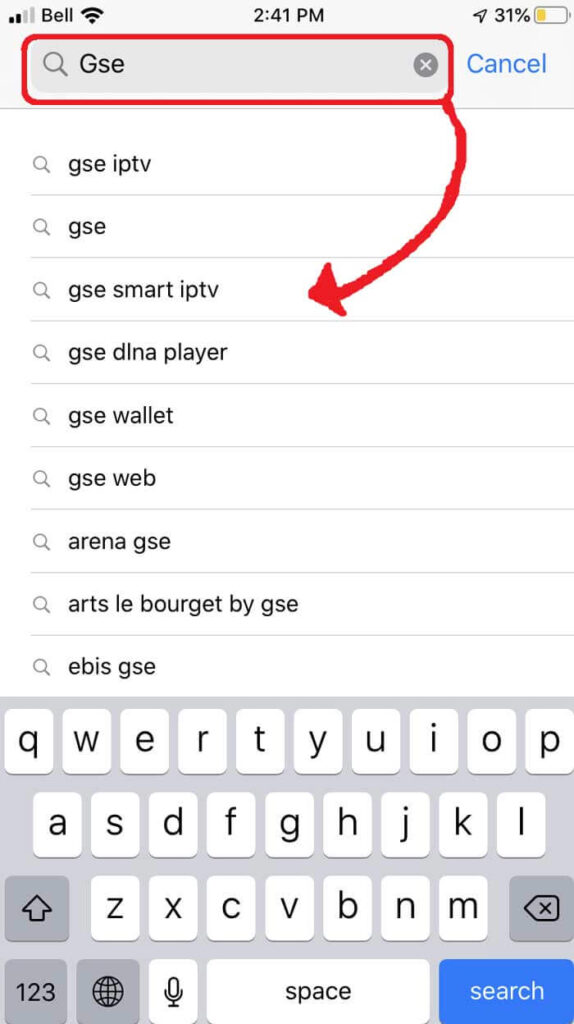
Next, search for the GSE SMART IPTV app.
STEP 3:
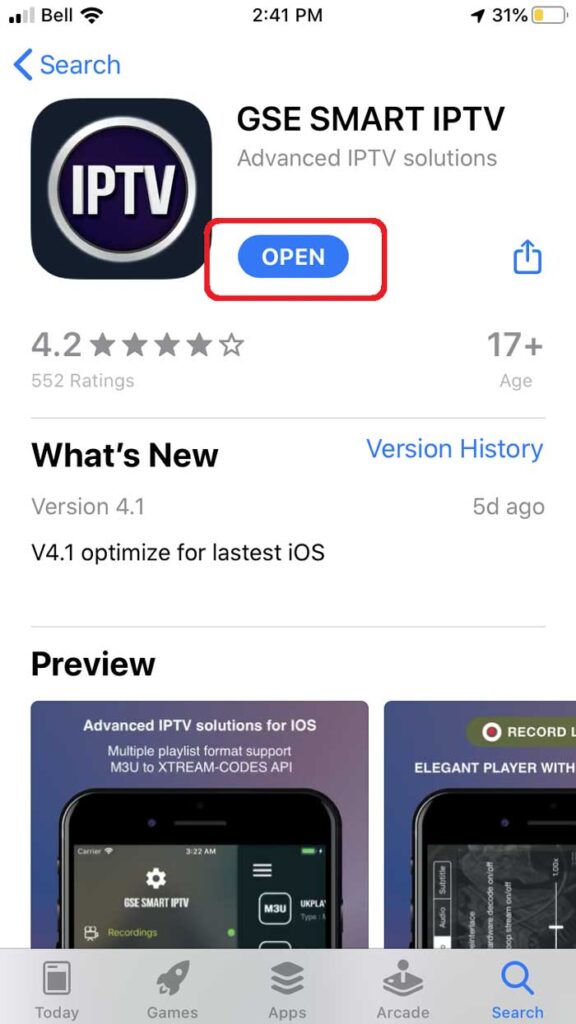
Select the GSE SMART IPTV app developed by droidvision. The tagline for the app is ‘Advanced IPTV solutions’. Note the app size is 104.5 MB.
STEP 4:
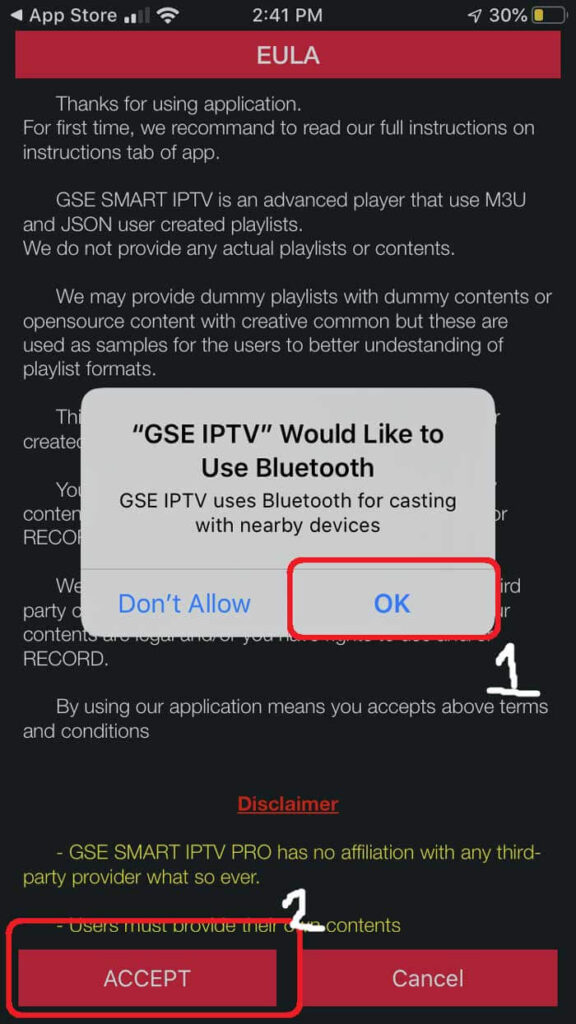
Once you’ve installed the GSE app, go ahead and open it and allow for Bluetooth connectivity. This way you can cast your screen from iPhone or iPad directly to your TV via Google Chromecast.
STEP 5:
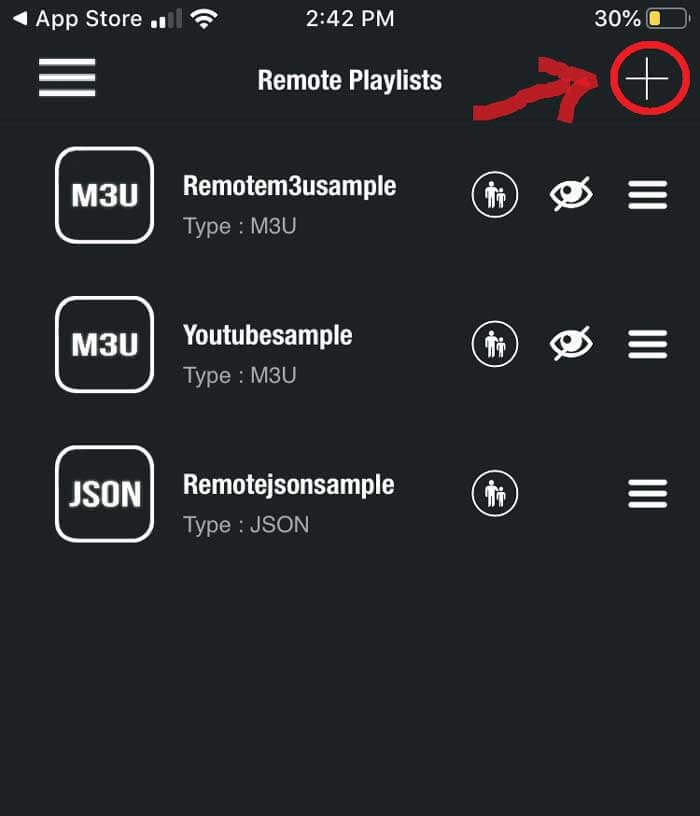
Under the remote playlist section, you will see Plus sign on the upper right-hand side. Press this button. Alternatively, you can go into the menu to add your M3U playlist.
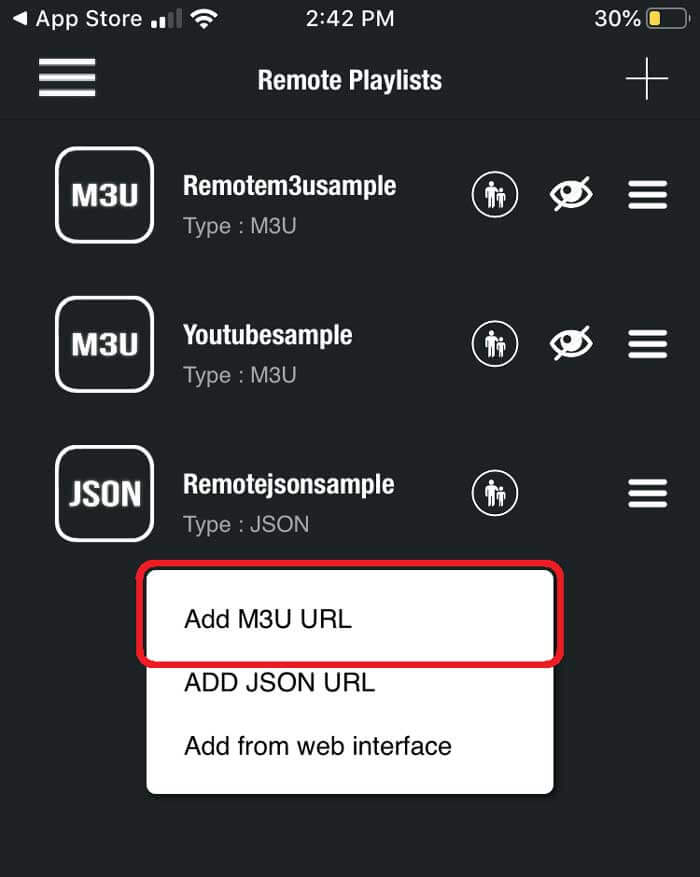
STEP 6:
Here it will ask if you’d like to Add an M3U URL, Add Json URL, or add from the web interface. Go ahead and select add M3U URL option.
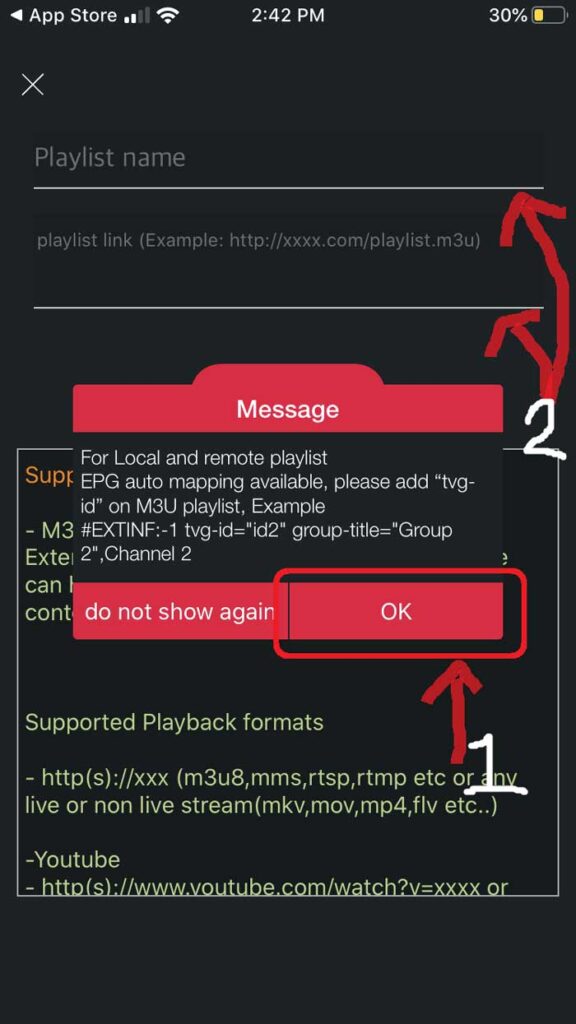
STEP 7:
For playlist name, we can write anything as this is just for reference for loading this particular URL from the playlist manager. The playlist link is the actual URL we’ll need to copy and paste into here.
STEP 8:
Once entered it should download the playlist. If it does not, go back to the playlist manager menu (SEE STEP 5). Here you should see the M3U URL file we just uploaded. Tap it to load the playlist created.
STEP 9:
You’ll know it’s successfully loaded if you see the different channel groups. You have successfully configured the GSE SMART IPTV app and ready to start streaming!
MAG boxes are some of the most robust streaming media players. IPTV users choose them for their speed, Simplicity, and excellent streaming performance. The user interface is simple and responsive, channel switching is quick and you receive all the features required to get the most out of your IPTV service.
STEP 1:
When the box is being loaded the main portal screen appears. After that click on “settings”, press the remote button “SETUP/SET”
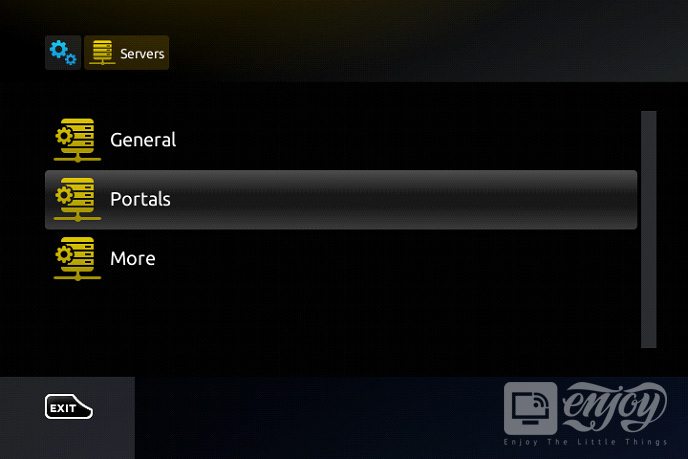
STEP 2:
Then press on “System settings” and click on “Servers”.
STEP 3:
Select “Portals”.
STEP 4:
In the “Portal 1 name” line enter the following ” IPTV “.
In the “Portal 1 URL” enter the portal address provided by your IPTV service provider.
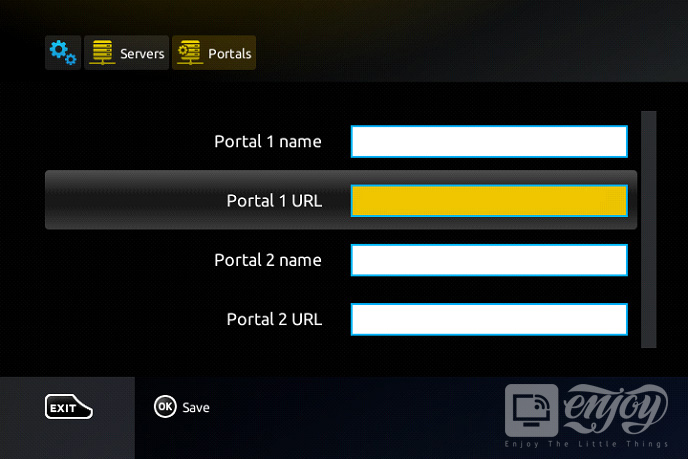
STEP 5:
When all the operations listed above are done, then press “OK”.
When the settings are being saved click “EXIT” on the remote control and press the option “General”.
In the “NTP server,” line enter the following address “pool.ntp.org or us.pool.ntp.org“ for North America.
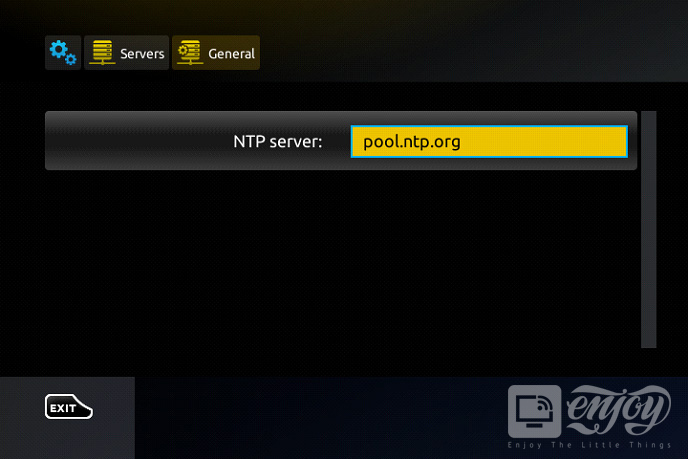
Press “OK” to save the changes you made.
When all the steps listed above are done press ”EXIT” 2 times on the remote control and restart the portal. Now everything is ready to start watching Live TV.
Setup instruction for Samsung & LG Smart TV. Most of the IPTV service uses a media controller app called ‘DuplexPlay’. DuplexPlay is free to try for 7 days. After this period you are welcome to pay a small amount to support the app, maybe $0.99 for 6 months and $1.99 for 12 months.
Download DuplexPlay into your Smart TV:
- Go to your TV apps store
- Search for DuplexPlay
- Install DuplexPlay and open DuplexPlay
- Now you can see your Device ID and Device Key on your TV screen
STEP 1: Note your Device ID and Device Key
After installing the application, Open it and you will see the Device ID and Device key (You can find it by choosing the activation tab too).
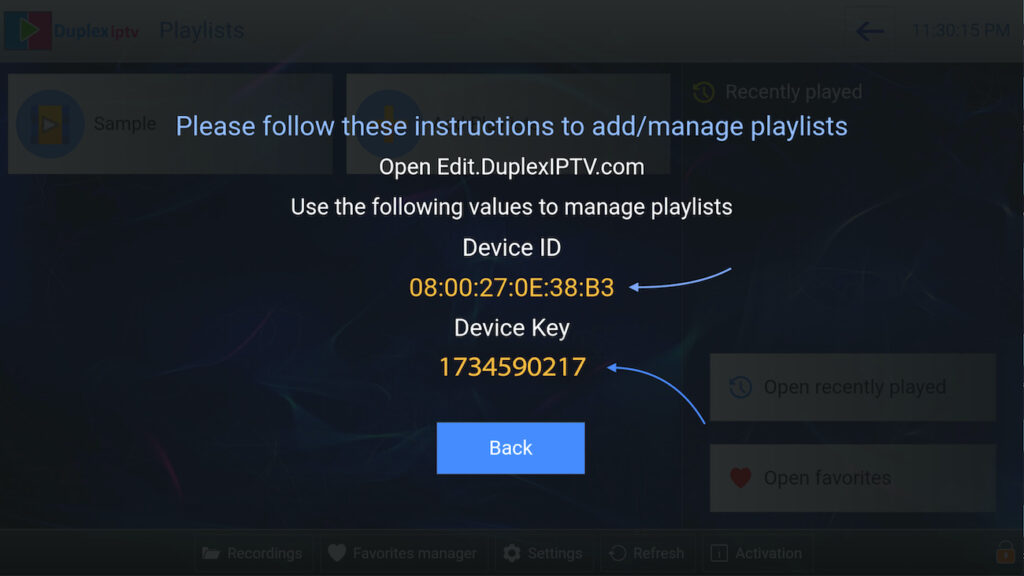
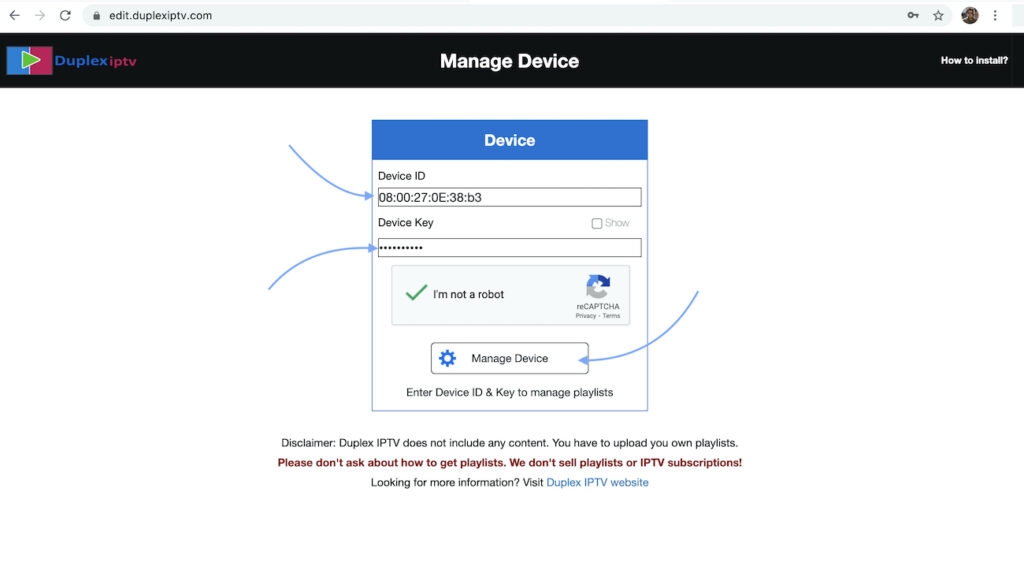
STEP 2: Login into the DuplexPlay management portal
Navigate to edit.duplexplay.com and Enter the Device ID and Device key you noted in STEP 1, Then click on Manage Device.
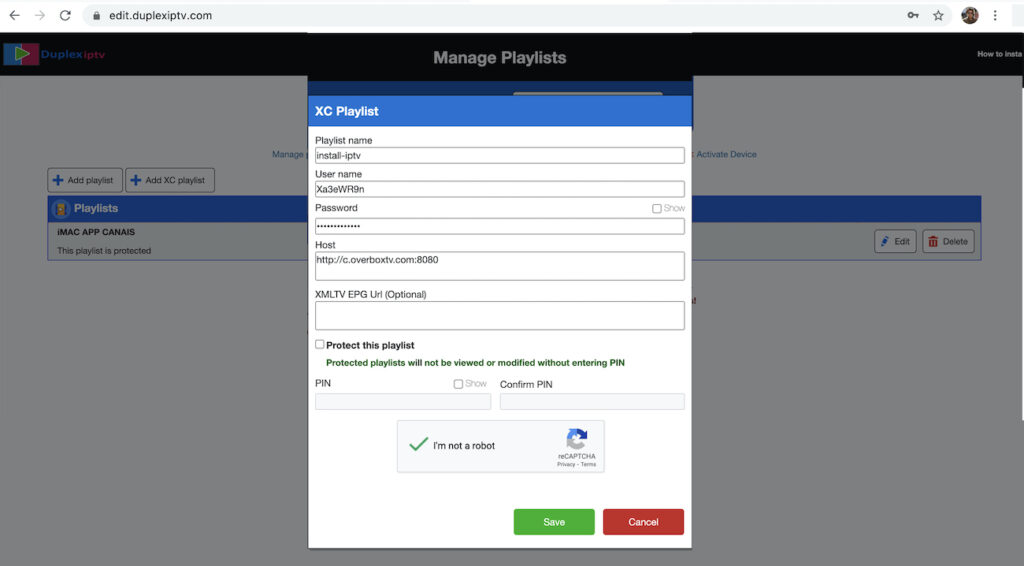
STEP 3: Add XC Playlist
You can add a playlist via both methods M3u Link and Xtream connection, We recommend connecting via XC (Xtream Codes API) playlist.
And submit your Xtream Codes API details which have delivered from your IPTV provider If you have not click here for an IPTV subscription now.
Playlist Name: You can set any name for your playlist.
Enter Username, Password, and Host (Server URL of Xtream Codes connection). Complete captcha and click on Save.
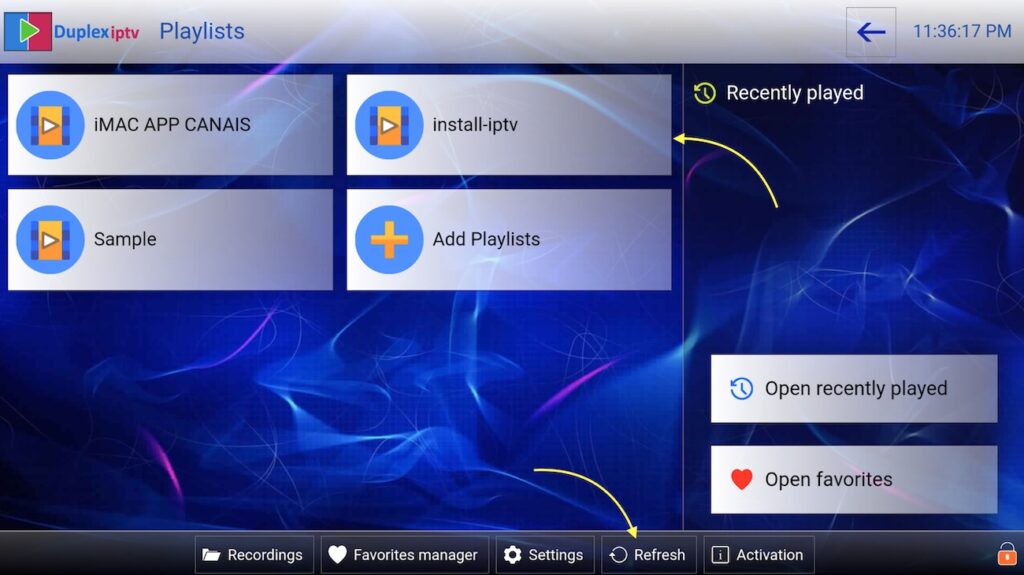
STEP 4: Refresh Playlists in the application
Then back to the DuplexPlay application and choose Refresh to reload Playlists, Then the playlist name must appear.
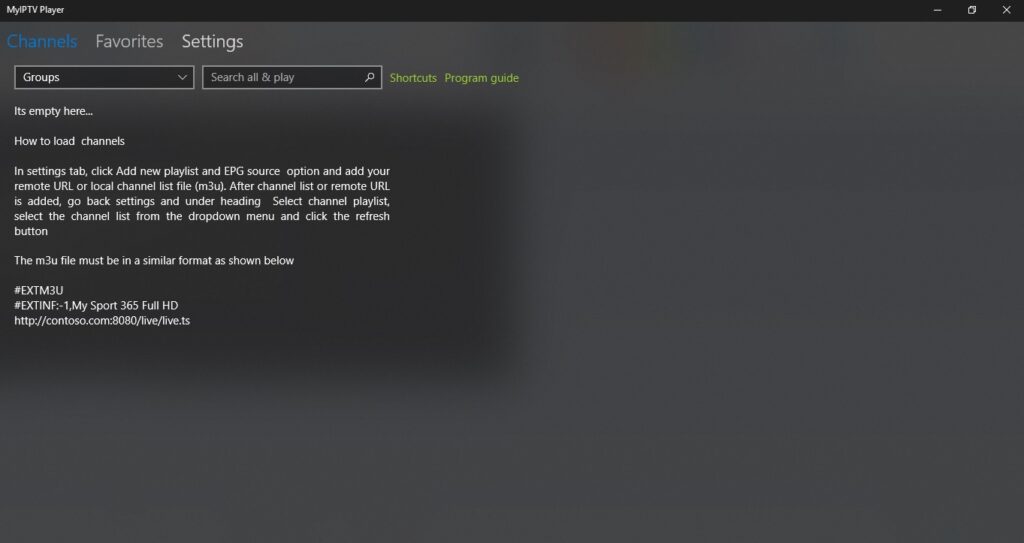
To set up IPTV on the MyIPTV Player for PC, you must first download and install the software. You can download the app by clicking this link if you have not yet done so: https://www.microsoft.com/en-us/p/myiptv-player/9pjj2nmbf0tr?activetab=pivot:overviewtab
STEP 1:
After you have downloaded and installed the app open it. You will be greeted with this screen like the image below.
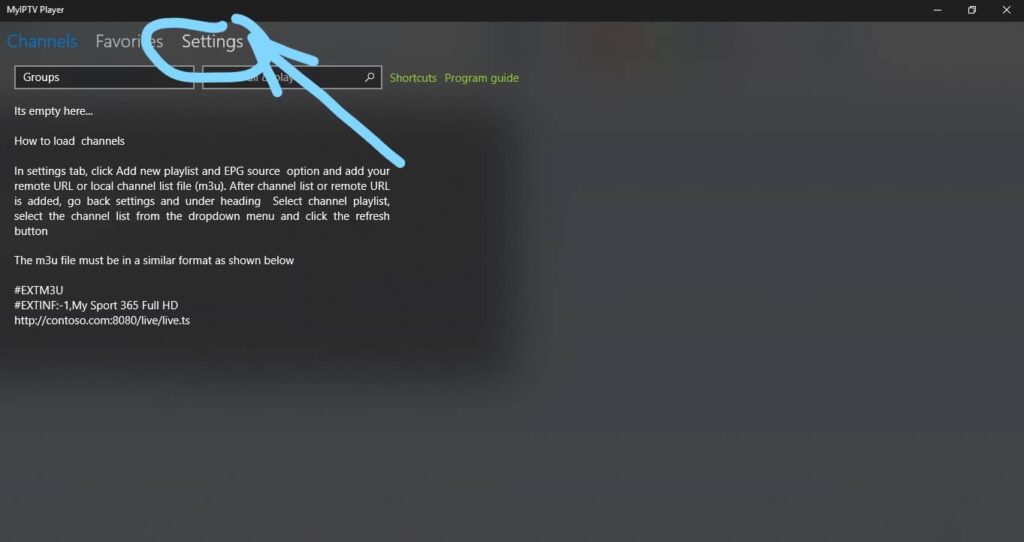
STEP 2:
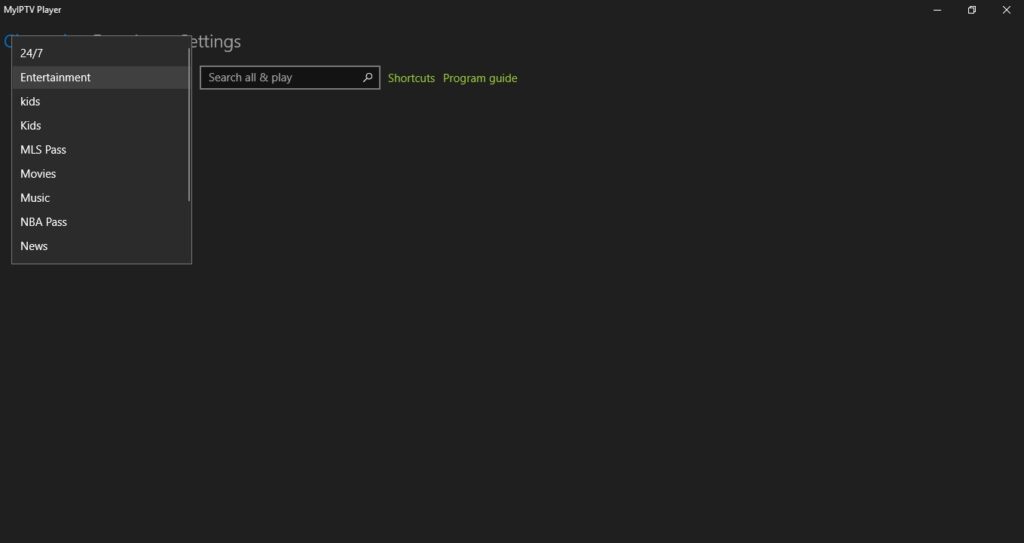
Now select “settings at the top of the screen”.
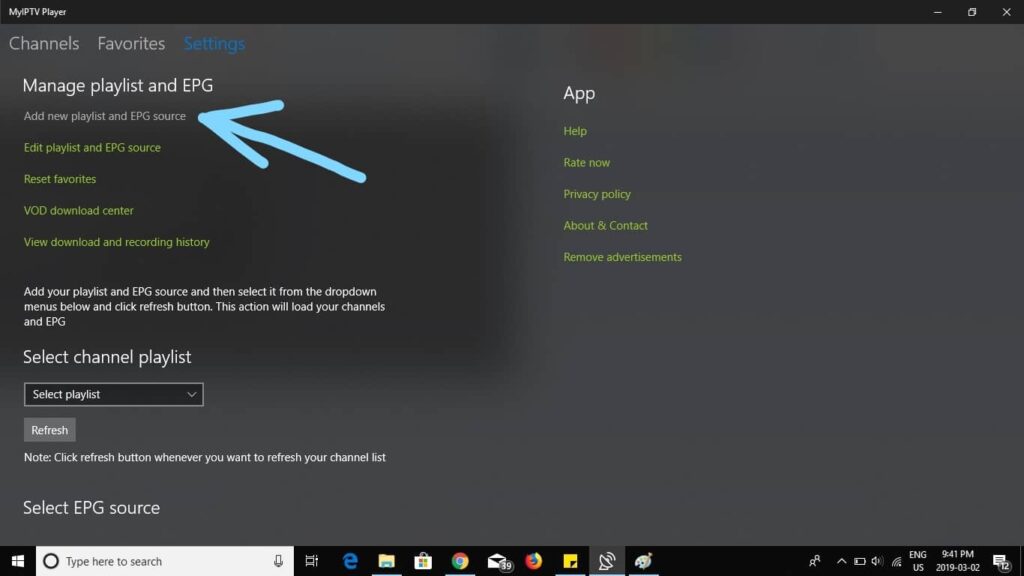
STEP 3:
Select Add new playlist and EPG source.
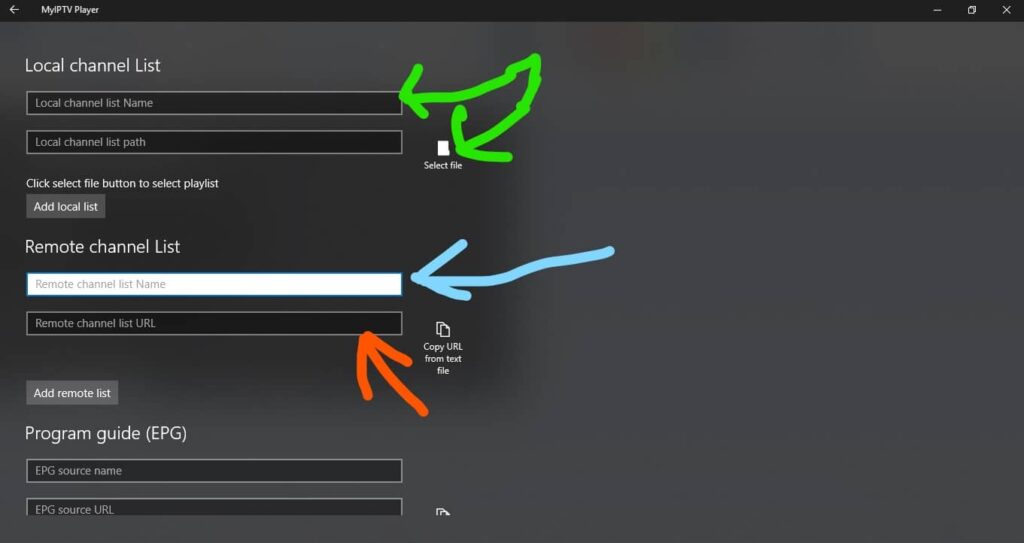
STEP 4:
Enter a name for your playlist at the blue arrow then enter your m3u playlist URL from your provider at the orange arrow.
(Optional) if have downloaded the playlist to your PC select it at the green arrow otherwise skip this step.
STEP 5:
Scroll down to the program guide section and enter a made-up name for the source name then enter your EPG source URL from your provider.

STEP 6:
Go back by pressing the arrow at the top left corner of the screen.
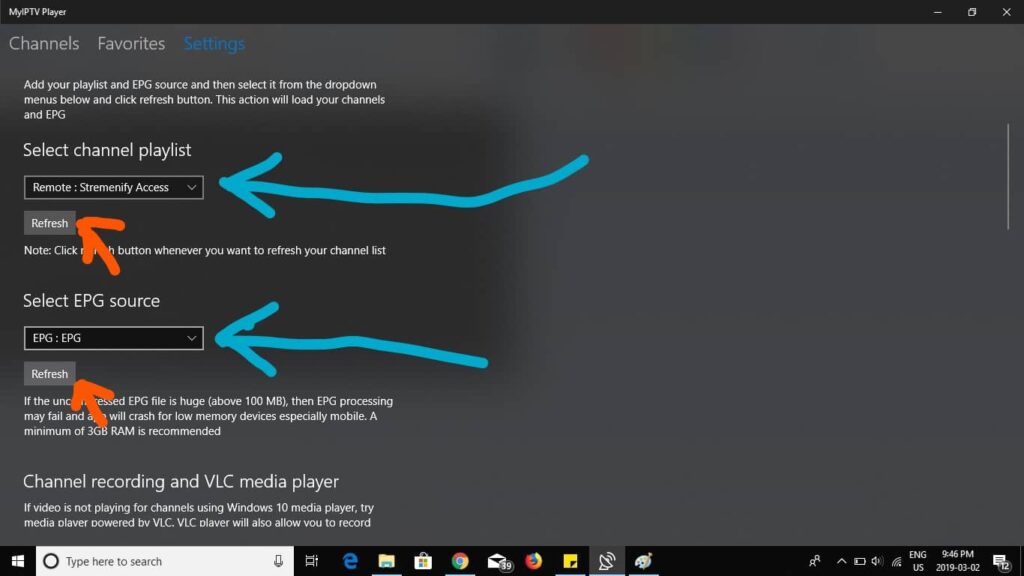
Select the channel playlist that you created by selecting the drop-down menu at the blue arrow.
Select the EPG source that you created by selecting the drop-down menu at the blue arrow.
Select the refresh button for channel playlist and EPG source at the orange arrows.
STEP 7:
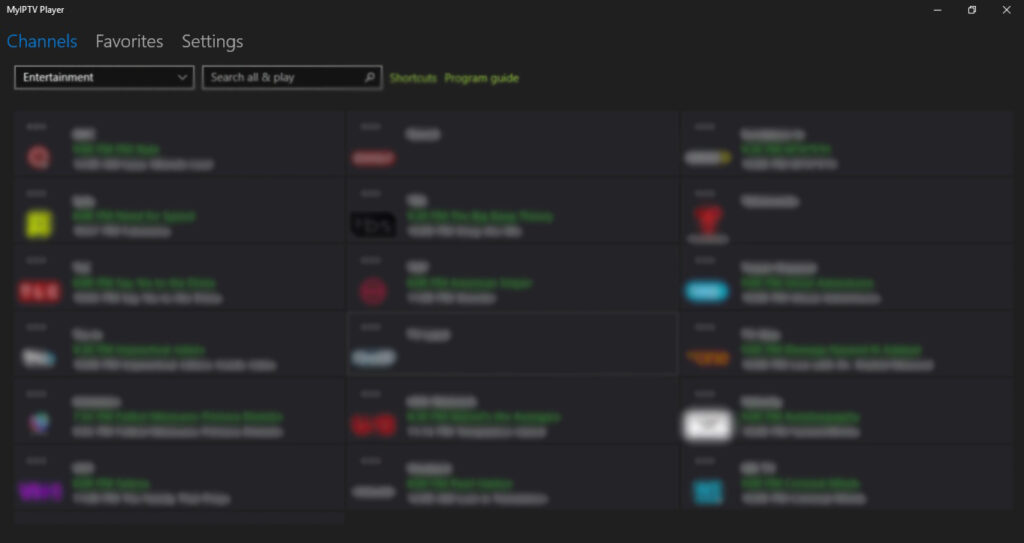
Select channels at the top left corner of the screen.
Select the drop-down under channels and choose your category.
You should see your channels load after you selected your category.
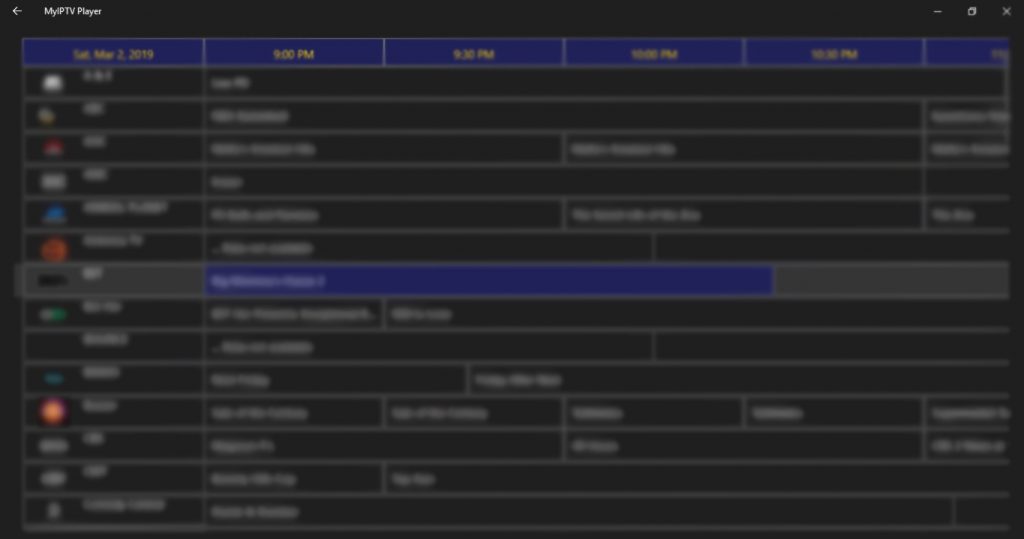
Select program guide to view EPG.
FormulerZ boxes are one of the best devices for watching IPTV.
The most important advantage of FormulerZ boxes is supporting both MAC base Portal System and M3U base Playlist.
FormulerZ8 is the last version of Formuler boxes with MYTV Online 2 application which support 4K Ultra HD streaming,
In this tutorial, we are going to show you how to bring IPTV channels to your MYTV Online 2 on FormulerZ8.
This setup guide can be used for all models of Formuler devices/boxes:
STEP 1:
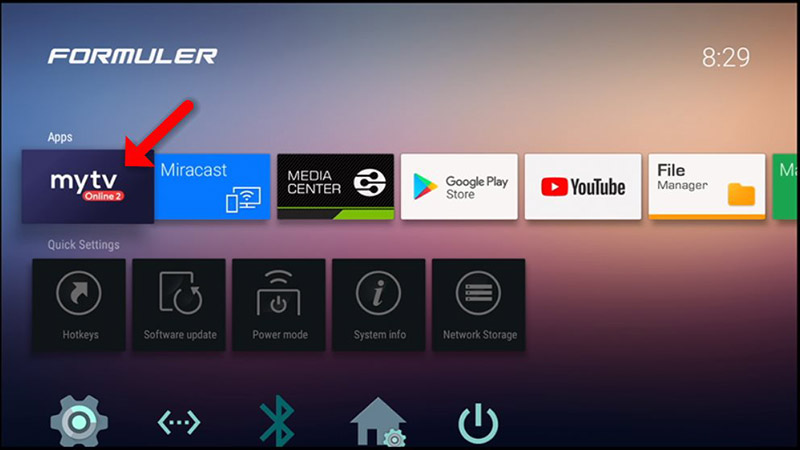
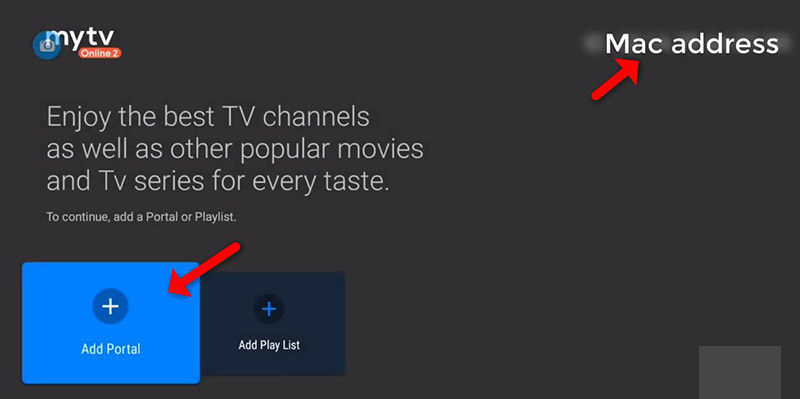
Open the exclusive application for watching IPTV in Formuler boxes “MYTV Online 2”.
If you don’t have this application on your device you can download it from the Google Play store.
STEP 2:
You can see the box’s MAC in the top right of this page.
Please note, this MAC address must be given to your IPTV provider.
Here you can see the two options, select “Add Portal” to set the device as a MAC based device like MAG boxes.
STEP 3:
Enter Portal Nickname (Example: MYIPTV).
Enter IPTV Portal URL you get from your IPTV provider and click on “CONNECT”. You can ask for a portal URL from your IPTV service provider.
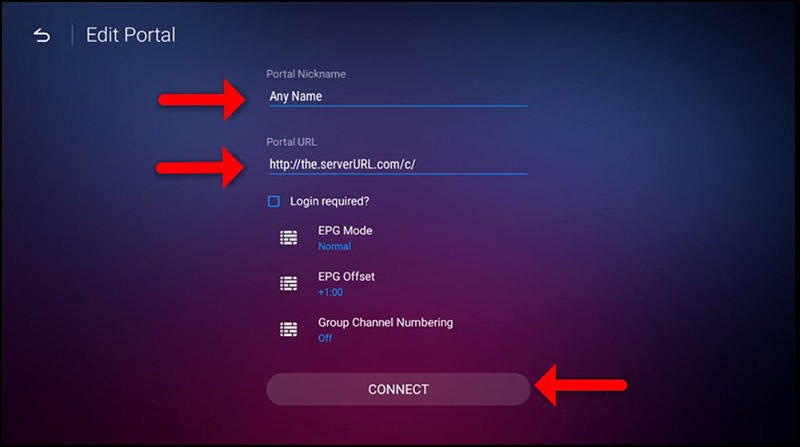
STEP 4:
Successful Connection! You receive all channels associated with your subscription
Please note, this might take a little time.
As a matter of fact, these two IPTV boxes are currently very popular in the United Kingdom and other parts of the world, and I believe that’s why you have one at home! We assume you are here because you would like to learn how to go about the Enigma 2 or Zgemma IPTV setup process, which is standard across the board.
In order to add channels to your Enigma2/Dreambox/Vu+ device, follow the below steps:
STEP 1:
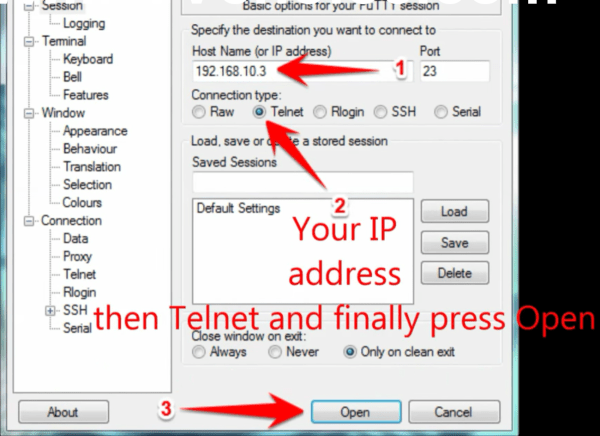
Go to your Enigma2 and get your IP address.
Go to Settings/Setup/System Network Device Setup Adapter Settings.
And get your IP address it starts with 192.168…..
STEP 2:
Go to your windows PC and download Putty Software.
Putty dURLload URL https://the.earth.li/~sgtatham/putty/latest/x86/putty.exe
STEP 3:
Open Putty and follow these steps.
Add your IP address of your Enigma ( Same IP as step 1 ) Port 23 Connection type Telenet Click on “Open”.
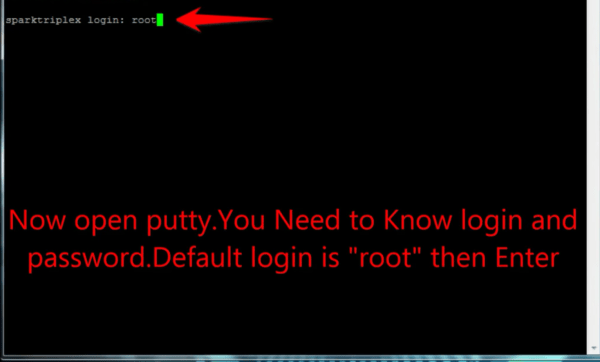
STEP 4:
Your default login and password are root.
STEP 5:
Copy your URL line (you will get it after you order your subscription).
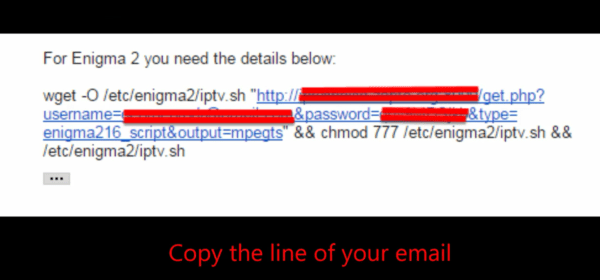
STEP 6:
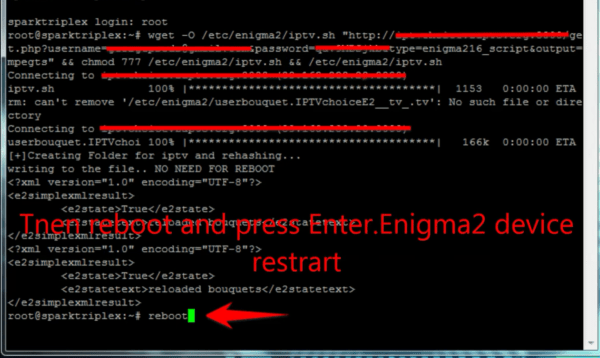
Use RIGHT CLICK MOUSE BUTTON after you enter your line press “ENTER”.

STEP 7:
Type reboot and your device will restart.
Now you will find the IPTV folder, all IPTV channels are inside your IPTV folder.
The Dreamlink T1 and T2 are devices that grant access to IPTV channels. They include a user interface based on the Stalker Middleware, an interface that is intended to convert these online channels into a menu from which you can simply select which channel you require to watch.
Basically, these merchandises make it simpler for you to see the numerous channels that are on offer and pick whichever one catches your imagination. The user interface also includes a web browser, video player, and a mixture of other apps.
In order to add channels to your Dreamlink device, follow the below steps:
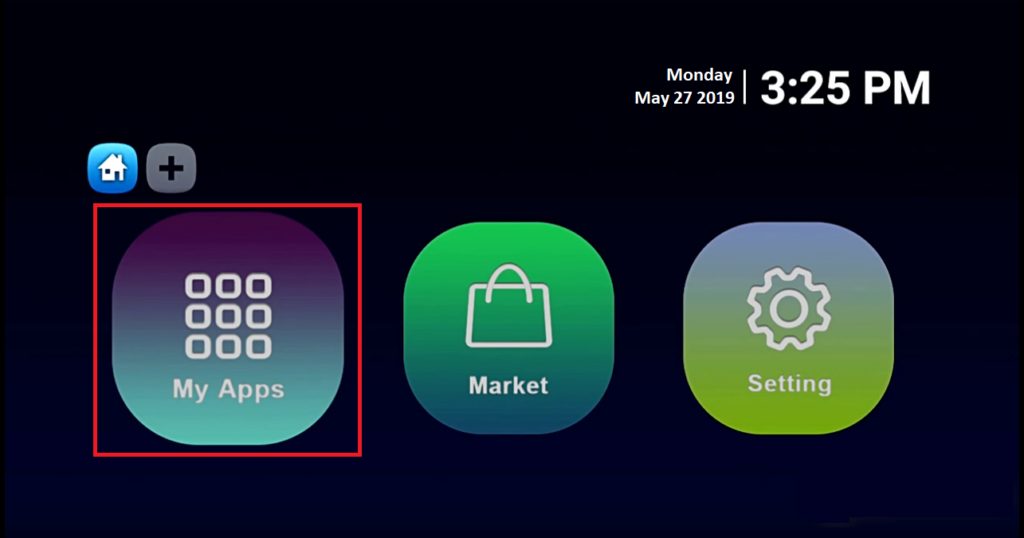
STEP 1:
From the main page, go to “My Apps“.
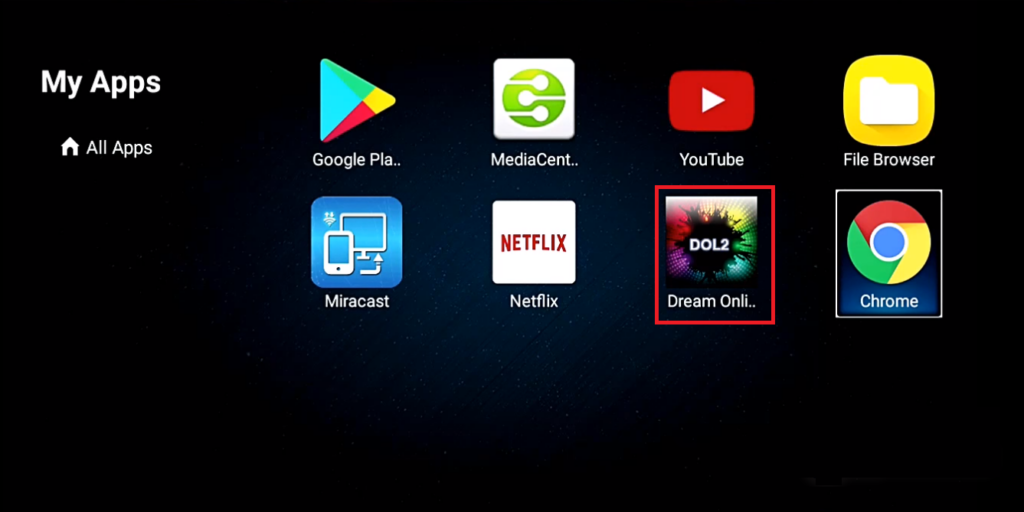
STEP 2:
Select DreamOnline (DOL 2).
Note, If the DreamOnline (DOL2) app is not in the My apps folder go to the Market folder, find DreamOnline (DOL2) and install it. After that, it will appear in the My apps folder/
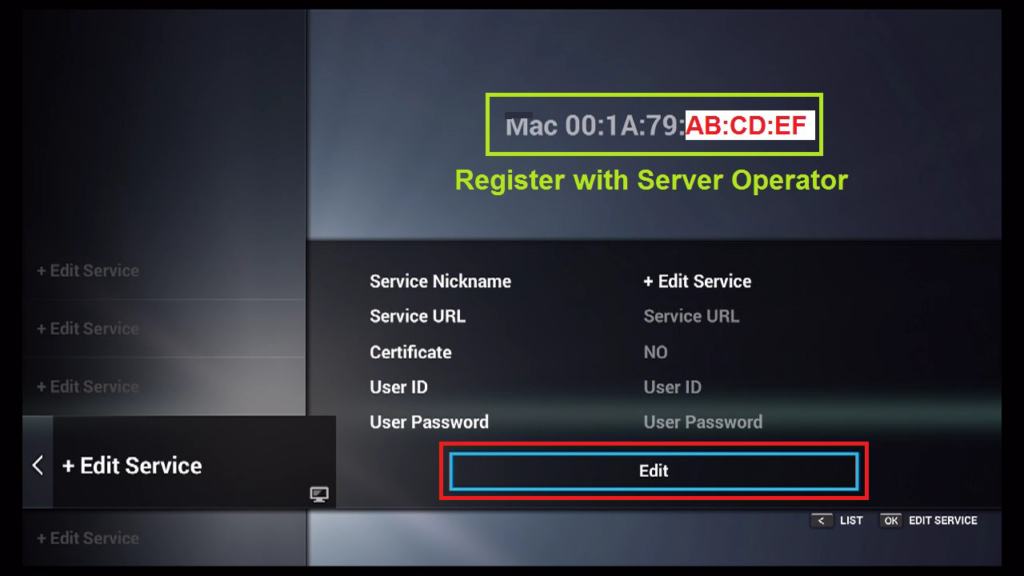
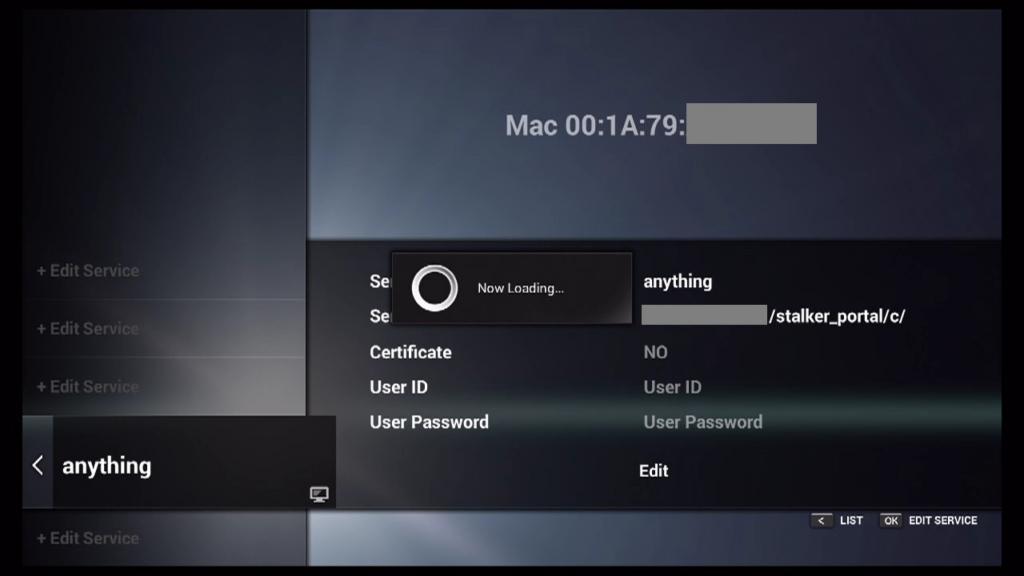
STEP 3:
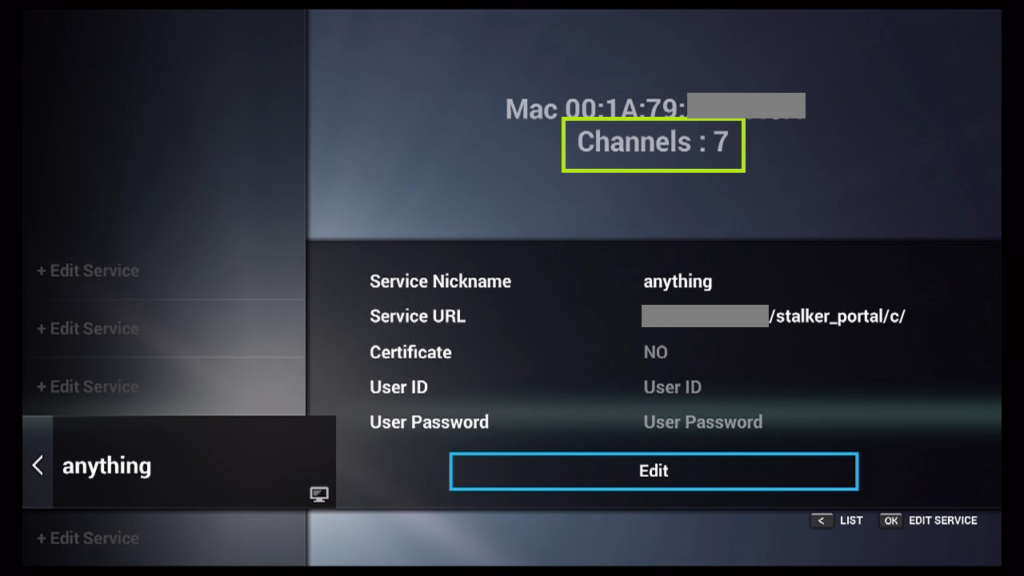
Now select “Edit Service” and then click on “Click Edit“.
Important: Be sure you register on (Server Operator Homepage) with your right MAC Address (if necessary).
STEP 4:
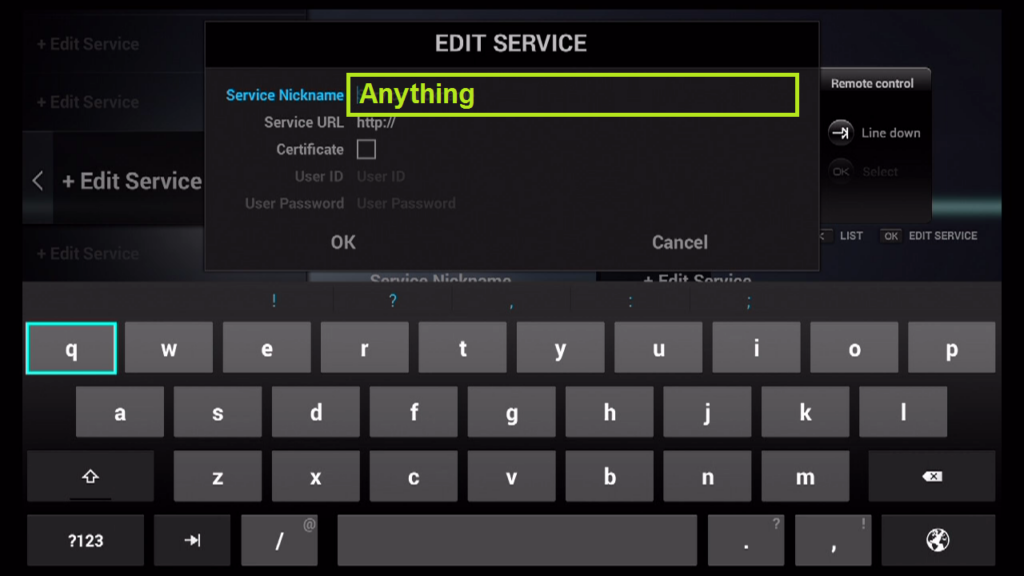
Enter Service Nickname (Any name).
STEP 5:
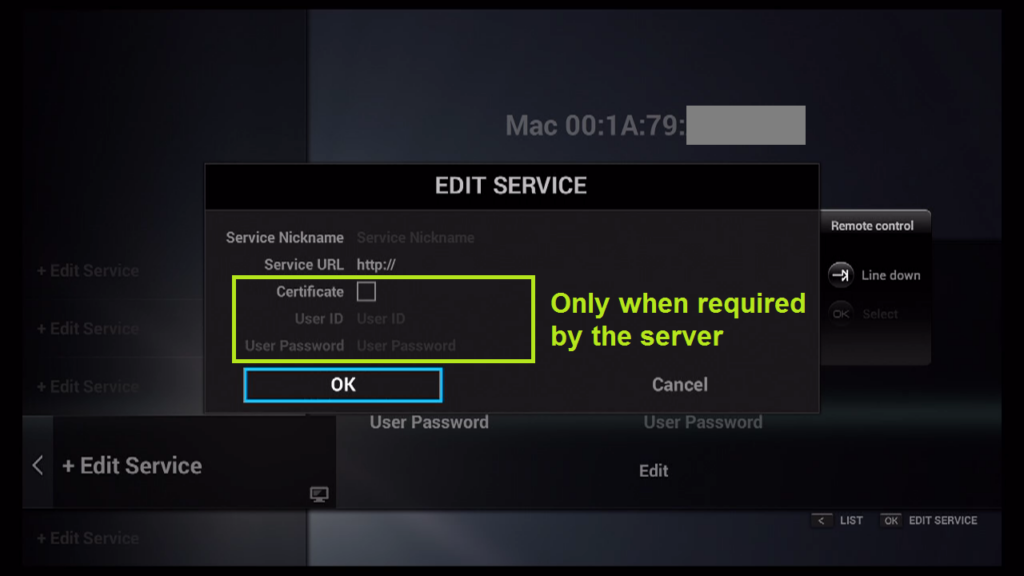
Enter the IPTV Server URL (Portal URL) you get from your IPTV service provider.

STEP 6:
It is NOT necessary to enter the Username and Password.
STEP 7:
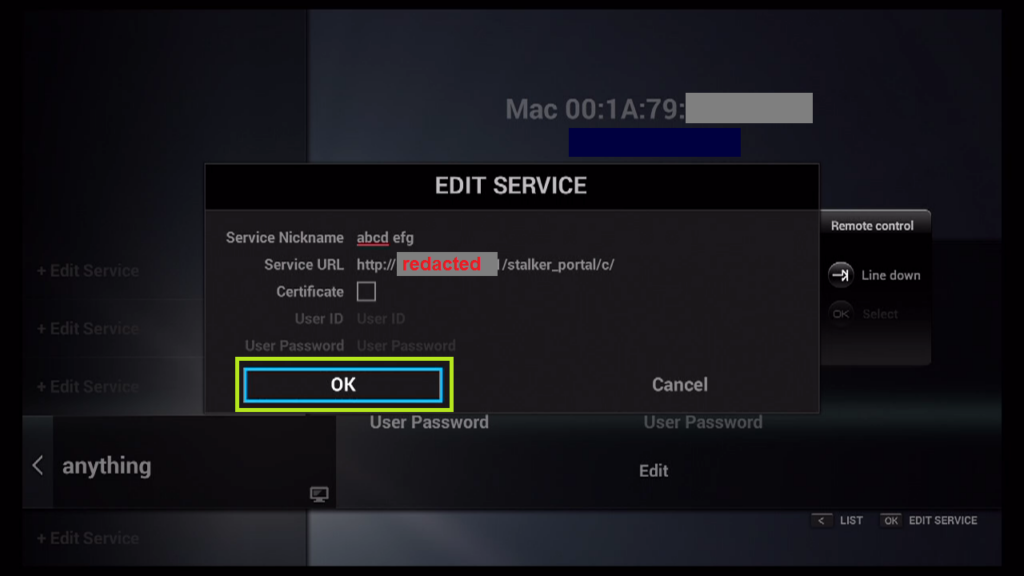
Click “OK“.
STEP 8:
Connecting to IPTV Server (with your registered data) in progress.
STEP 9:
Successful Connection! You receive all channels associated with your account.